记住用户名密码
php qrcode 生成二维码后变成透明背景且按需调整大小并贴到图片的指定位置
发现自己快两个月没写博客,最近搞定毕业的相关事情了,稍微松点了,可以全身心地投入到工作中来,今天想起写写博客,记录下最近工作过的内容,供以后查看温习。打算建立个栏目专门存放工作的记录内容,希望能坚持下来。
需求:生成存放链接的二维码并调整大小后贴到另外图片的指定位置,由于要贴二维码的图片的张贴二维码位置是圆角矩形(注意是圆角,这样一来直接将生成的白色背景的二维码贴上去的话,肯定在四个角会遮挡到原图,导致视觉效果下降),所以我需要将生成的矩形二维码处理成圆角矩形二维码或者将二维码的背景去掉即变成透明背景,这样就不怕影响原图背景了。我尝试是先将矩形二维码变成圆角二维码,再贴到图片的指定二维码位置,于是通过百度找到了将矩形图片变成圆角图片的方法,代码如下:
思路是直接在一个透明背景图上画圆角图像:
function radius_img($imgpath, $radius = 80) {
	$ext     = pathinfo($imgpath);
	$src_img = null;
	switch ($ext['extension']) {
	case 'jpg':
		$src_img = imagecreatefromjpeg($imgpath);
		break;
	case 'png':
		$src_img = imagecreatefrompng($imgpath);
		break;
	}
	$wh = getimagesize($imgpath);
	$w  = $wh[0];
	$h  = $wh[1];
	$radius = $radius <= 0 ? (min($w, $h) / 2) : $radius;
	$img = imagecreatetruecolor($w, $h);
	// 关闭 alpha 渲染并设置 alpha 标志
        imagealphablending($img, false);//关闭混合模式,以便透明颜色能覆盖原画板
        imagesavealpha($img, true);//设置保存PNG时保留透明通道信息
	//拾取一个完全透明的颜色,最后一个参数127为全透明
	$bg = imagecolorallocatealpha($img, 255, 255, 255, 127);
	//echo $bg;die;//2147483647
	imagefill($img, 0, 0, $bg);//构造透明背景图
	$r = $radius; //圆角半径
	for ($x = 0; $x < $w; $x++) {//遍历原图的像素点
		for ($y = 0; $y < $h; $y++) {
			$rgbColor = imagecolorat($src_img, $x, $y);
			if (($x >= $radius && $x <= ($w - $radius)) || ($y >= $radius && $y <= ($h - $radius))) {
				//不在四角的范围内,直接画
				imagesetpixel($img, $x, $y, $rgbColor);
			} else {
				//在四角的范围内选择画
				//上左
				$y_x = $r; //圆心X坐标
				$y_y = $r; //圆心Y坐标
				if (($x - $y_x) * ($x - $y_x) + ($y - $y_y) * ($y - $y_y) <= $r * $r) {//圆内部
					imagesetpixel($img, $x, $y, $rgbColor);
				}
				//上右
				$y_x = $w - $r; //圆心X坐标
				$y_y = $r; //圆心Y坐标
				if (($x - $y_x) * ($x - $y_x) + ($y - $y_y) * ($y - $y_y) <= $r * $r) {
					imagesetpixel($img, $x, $y, $rgbColor);
				}
				//下左
				$y_x = $r; //圆心X坐标
				$y_y = $h - $r; //圆心Y坐标
				if (($x - $y_x) * ($x - $y_x) + ($y - $y_y) * ($y - $y_y) <= $r * $r) {
					imagesetpixel($img, $x, $y, $rgbColor);
				}
				//下右
				$y_x = $w - $r; //圆心X坐标
				$y_y = $h - $r; //圆心Y坐标
				if (($x - $y_x) * ($x - $y_x) + ($y - $y_y) * ($y - $y_y) <= $r * $r) {
					imagesetpixel($img, $x, $y, $rgbColor);
				}
			}
		}
	}
	return $img;
}
header("content-type:image/png");
$img = radius_img('1.jpg');
imagepng($img,"res_1.jpg");//写入图片
@imagepng($img);
imagedestroy($img);
以上代码经测试,只有彩色图片是成功的,黑白的二维码图片画出的圆角图片严重损坏,无法分辨,我猜可能是颜色分辨度的问题吧。于是找到另一种画圆角图的代码如下所示,它的原理是直接在原图上画四个角的圆弧,四个角只能用其它颜色盖住,结果效果也不符合要求,不过还是贴下代码:
    // 圆角处理
    $radius  = 30;
    $resource = imagecreatefrompng("qrcode.png");
    imagealphablending($resource, false);
    $info = getimagesize("qrcode.png");
    $image_width = $info[0];
    $image_height = $info[1];
    // lt(左上角)
    $lt_corner  = get_lt_rounder_corner($radius);
    imagecopymerge($resource, $lt_corner, 0, 0, 0, 0, $radius, $radius, 100);
    // lb(左下角)
    $lb_corner  = imagerotate($lt_corner, 90, 0);
    imagecopymerge($resource, $lb_corner, 0, $image_height - $radius, 0, 0, $radius, $radius, 100);
    // rb(右上角)
    $rb_corner  = imagerotate($lt_corner, 180, 0);
    imagecopymerge($resource, $rb_corner, $image_width - $radius, $image_height - $radius, 0, 0, $radius, $radius, 100);
    // rt(右下角)
    $rt_corner  = imagerotate($lt_corner, 270, 0);
    imagecopymerge($resource, $rt_corner, $image_width - $radius, 0, 0, 0, $radius, $radius, 100);

    imagepng($resource,"newPic.png");
    header('Content-Type: image/png');
    imagepng($resource);
以上调用的方法如下:
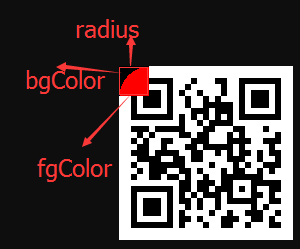
function get_lt_rounder_corner($radius) {
        $img     = imagecreatetruecolor($radius, $radius);  // 创建一个正方形的图像
        $bgcolor    = imagecolorallocate($img, 255, 255, 255);   // 图像的背景 感觉这里的颜色无影响,最后都是黑色!

        $fgcolor    = imagecolorallocate($img, 255, 0, 0);
        // $radius,$radius:以图像的右下角开始画弧
        // $radius*2, $radius*2:已宽度、高度画弧
        // 180, 270:指定了角度的起始和结束点
        // fgcolor:指定颜色
        imagefilledarc($img, $radius, $radius, $radius*2, $radius*2, 180, 270, $fgcolor, /*IMG_ARC_NOFILL*/IMG_ARC_PIE);
        // 将弧角图片的颜色设置为透明
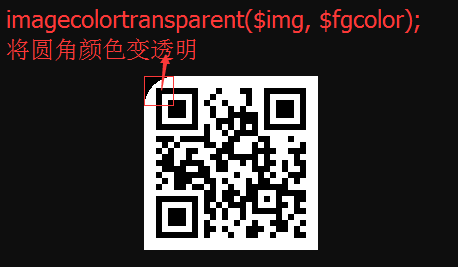
        imagecolortransparent($img, $fgcolor);

        // 变换角度
         //$img = imagerotate($img, 90, 0);
         //$img = imagerotate($img, 180, 0);
         //$img = imagerotate($img, 270, 0);
         //header('Content-Type: image/png');
         //imagepng($img);
        return $img;
    }


最终结果:(由于四角还是有颜色所以还是不行!)

于是突然想到直接把二维码图片背景变透明不就完事了,何必搞那么复杂。
但是在此过程中,由于我是先将二维码进行缩放后再变透明,结果导致图片背景有白点。。。想了很久后百度了,尝试很多解决方法还是无效,原因大致是缩放后损害了图片的质量。经过思考与尝试,我为啥不反过来呢?直接先将二维码变透明后再进行图片的缩放应该可以吧,经过测试,发现确实可以,真是解决了大问题啊啊啊!代码如下:
                //二维码内容
		$qrcodeContent = '此处存链接的话,参数不宜过长,否则导致生成二维码时间太长!!!';
		//容错级别
		$errorCorrectionLevel = 'L';
		//生成图片大小
		$matrixPointSize = 6;
		//生成二维码图片
		\QRcode::png($qrcodeContent, 'qrcode.png', $errorCorrectionLevel, $matrixPointSize, 2);
		$QR = 'qrcode.png';//已经生成的原始二维码图
		//将二维码背景变透明
		$resource = imagecreatefrompng($QR);
		@unlink($QR);
		$bgcolor = imagecolorallocate($resource, 255, 255, 255);
		imagefill($resource, 0, 0, $bgcolor);
		imagecolortransparent($resource, $bgcolor);
		imagepng($resource,'qrcode_copy.png');	/*先处理成透明图再进行缩放就不会出现白黑点情况了!!!(至少效果好多了,而先进行缩放再处理背景透明就会出现很多白黑点!)*/
		@imagedestroy($resource);
                //获取对应游戏海报二维码位置
                $qrcode_pos = $pos;//$pos = [x,y]
                //获取对应游戏海报二维码规格
                $qrcode_spec = $spec;//$spec = [w,h]
                $resource = smart_resize_image('qrcode_copy.png', $qrcode_spec[0], $qrcode_spec[1], true);
                imagepng($resource,'qrcode_'.$gameType.'.png');//存储改变大小后的透明二维码
                $qrcode = 'qrcode_'.$gameType.'.png';
                //将透明背景的二维码贴到海报图指定位置
                $poster_with_qrcode_or_invitedcode_url = waterImage($posterUrl, $qrcode, $qrcode_pos[0], $qrcode_pos[1]);
                @imagedestroy($resource);
                @unlink('qrcode_copy.png');
                @unlink($qrcode);
以上调用的方法如下:
/**
     * 调整图片大小并返回图片资源
     * @param $file
     * @param int $width
     * @param int $height
     * @param bool $proportional
     * @return bool|resource
     * @author zsb
     */
    function smart_resize_image($file, $width = 0, $height = 0, $proportional = false)
    {
        if ( $height <= 0 && $width <= 0 ) {
            return false;
        }
        $info = getimagesize($file);
        $image = '';
        $final_width = 0;
        $final_height = 0;
        list($width_old, $height_old) = $info;
        if ($proportional) {
            if ($width == 0) {
                $factor = $height/$height_old;
            }elseif ($height == 0) {
                $factor = $width/$width_old;
            }else {
                $factor = min ( $width / $width_old, $height / $height_old);
            }
            $final_width = round ($width_old * $factor);
            $final_height = round ($height_old * $factor);
        }else {
            $final_width = ( $width <= 0 ) ? $width_old : $width;
            $final_height = ( $height <= 0 ) ? $height_old : $height;
        }
        switch ($info[2]) {
            case IMAGETYPE_GIF:
                $image = imagecreatefromgif($file);
                break;
            case IMAGETYPE_JPEG:
                $image = imagecreatefromjpeg($file);
                break;
            case IMAGETYPE_PNG:
                $image = imagecreatefrompng($file);
                break;
            default:
                return false;
        }
        $image_resized = imagecreatetruecolor( $final_width, $final_height );
        if ( ($info[2] == IMAGETYPE_GIF) || ($info[2] == IMAGETYPE_PNG) ) {
            $trnprt_indx = imagecolortransparent($image);
            // If we have a specific transparent color
            if ($trnprt_indx >= 0) {
                // Get the original image's transparent color's RGB values
                $trnprt_color  = imagecolorsforindex($image, $trnprt_indx);
                // Allocate the same color in the new image resource
                $trnprt_indx  = imagecolorallocate($image_resized, $trnprt_color['red'], $trnprt_color['green'], $trnprt_color['blue']);
                // Completely fill the background of the new image with allocated color.
                imagefill($image_resized, 0, 0, $trnprt_indx);
                // Set the background color for new image to transparent
                imagecolortransparent($image_resized, $trnprt_indx);
            }
            // Always make a transparent background color for PNGs that don't have one allocated already
            elseif ($info[2] == IMAGETYPE_PNG) {
                // Turn off transparency blending (temporarily)
                imagealphablending($image_resized, false);
                // Create a new transparent color for image
                $color = imagecolorallocatealpha($image_resized, 0, 0, 0, 127);
                // Completely fill the background of the new image with allocated color.
                imagefill($image_resized, 0, 0, $color);
                // Restore transparency blending
                imagesavealpha($image_resized, true);
            }
        }

        imagecopyresampled($image_resized, $image, 0, 0, 0, 0, $final_width, $final_height, $width_old, $height_old);

        return $image_resized;
    }

    /**
     * 获取图片信息
     * @param $filename 传过来的参数是文件名字符串
     * @return mixed 返回值是一个数组,包含图片宽度、高度、创建和输出的字符串以及扩展名
     *  @author zsb
     */
    function getImageInfo($filename){
        if(@!$info = getimagesize($filename)){//getimagesize()函数可以得到文件信息,
            //还可以判断图片是否为真实的图片类型,详细功能见PHP手册
            exit('文件不是真实图片');
        }
        $fileInfo['width'] = $info[0];
        $fileInfo['height'] = $info[1];
        $mime = image_type_to_mime_type($info[2]);//info[2]这个是图片类型对应的数字,此函数可以根据该数字返回出文件对应的MIME类型,详细见手册
        $createFun = str_replace('/', 'createfrom', $mime);//将$mime中的'/'替换成'createfrom',
        //因为后边要用到imagecreatefromjpeg/jpg/png 这个函数,这样就可以动态使用不同的函数了
        $outFun = str_replace('/', '', $mime);
        $fileInfo['createFun'] = $createFun;
        $fileInfo['outFun'] = $outFun;
        $fileInfo['ext'] = strtolower(image_type_to_extension($info[2]));//image_type_to_extension()是得到文件后缀名函数
        return $fileInfo;//返回文件信息
    }

    /**
     * 给图片加水印并返回新图片地址
     * @param $dstName
     * @param $srcName
     * @param int $x 图片水印的位置  (0,0)代表左上角
     * @param int $y 图片水印的位置  (0,0)代表左上角
     * @param string $dest 默认保存的位置
     * @param string $pre  默认文件名前缀
     * @param int $pct  图片水印的透明度
     * @return string
     * @author zsb
     */
    function waterImage($dstName, $srcName, $x = 0, $y = 0, $dest = 'images/waterImage', $pre = 'waterImage_', $pct = 100){
        //获取图片信息
        $dstInfo = getImageInfo($dstName);
        $srcInfo = getImageInfo($srcName);
        //创建画布
        $dst_im = $dstInfo['createFun']($dstName);
        $src_im = $srcInfo['createFun']($srcName);
        $src_width = $srcInfo['width'];
        $src_height = $srcInfo['height'];
        $dst_width = $dstInfo['width'];
        $dst_height = $dstInfo['height'];

        imagecopymerge($dst_im, $src_im, $x, $y, 0, 0, $src_width, $src_height, $pct);

        if($dest && !file_exists($dest)){
            mkdir($dest,0777,true);
        }

        //$randNum = mt_rand(100000,999999);
        $dstName = "$pre".$dstInfo['ext'];
        $destination = $dest ? $dest.'/'.$dstName : $dstName;
        $dstInfo['outFun']($dst_im,$destination);
        imagedestroy($src_im);
        imagedestroy($dst_im);
        return $destination;
    }
主要代码基本是网上百度的,感谢这些人,我只是加了部分修改变成自己能用的东西罢了!上述测试代码仅供参考,请按需修改
目前有 0 条留言 其中:访客:0 条, 博主:0 条